I’m usually more of a chocolate lover when it comes to dessert, but the summer months have a tendency to making me crave something a little more tart. These luscious lemon cups have just the right combination of sweet and sour to satisfy my needs – oh and they are pretty guilt free! Thanks to Oatmeal With A Fork for this incredible recipe. Ingredients
Crust:
¾ c. walnuts
¼ c. unsweetened coconut
5 soft dates (I used Medjool)
¼ t. salt
1 t. lemon juice Lemon Filling:
6 T. coconut oil, softened
2 T. maple syrup
2 T. lemon juice
1 t. lemon zest
5 drops stevia, to taste
Directions
Combine the crust ingredients using a food processor. Divide evenly among 10 silicon muffin cups (or you could use one baking dish if you’d rather not pre-portion). Press down firmly, for me using the back of a spoon helped to ensure it was really packed well. Next, place the coconut oil into a small bowl and beat with a hand mixer until it becomes creamy. This took about a minute or two. Add the rest of the lemon filling ingredients and beat until well combined. Spread the top layer onto the bottom layer. Freeze for 15 – 30 minutes until set.
For best results and texture, thaw the cups either in the fridge or on the counter for about 20 minutes before serving.
These little healthy balls have been popping up all over the internet, but the recipe to create them is so elusive. I’ve searched high and low and haven’t found anything easy enough to try myself, so I decided to come up with my own concoction. To say these are delicious is an understatement. I have made them three times since coming up with the recipe and each time they are devoured in the blink of an eye. These little mounds of energy are so great that even Neil asked me to name them after him… so without further ado – I present you with:
Neil’s Balls
[yes that was his choice of name]Ingredients
1 cup of oats
2/3 cup unsweetened shredded coconut
1/3 cup chia seeds
1/2 cup almond butter
1/3 cup unsweetened carob chips
1/4 cup of goji berries
2tbsp honey
1 dropper full of liquid stevia
a bit of water to mix (if you need)
Directions
Using a fork, mix all ingredients together in a large bowl. Place the “dough” in the fridge to chill for 15-30 minutes. Roll into balls. Using this recipe I made 15 balls.
This is the perfect summer treat since you don’t even need to turn on the oven! I promise they will be hit and no one will even know they are healthy!
Cue the drooling. These ooey, gooey bars are unreal [okay – I couldn’t taste test them myself because they contain both dairy and gluten, but the reaction of others is enough for me to guarantee my statement]. This recipe is surprisingly simple, however, the clean up at the end is just a bit stick [duh – we are using caramel]. Just soak the dish in warm water before trying to scrub, you’ll thank me!
2 1/8 cups all-purpose flour
1/2 teaspoon salt
1/2 teaspoon baking soda
3/4 cup butter, melted and cooled to room temperature
1 cup light brown sugar
1/2 cup granulated sugar
1 large egg
1 large egg yolk
2 teaspoons vanilla extract
2 cups chocolate chips
10 ounces caramel candy squares, unwrapped
3 tablespoons heavy cream (or half & half)
Sea salt, for sprinkling over caramel and bars
Directions
1. Preheat oven to 325 degrees F. Spray a square Pyrex dish (approximately 9X9) with nonstick cooking spray and set aside.
2. In a medium bowl, whisk together flour, salt, and baking soda. Set aside.
3. In a large bowl, mix together the melted butter and sugars, using an electric beater if you have one, until combined. Add the egg, egg yolk, and vanilla extract and mix until smooth. Slowly add the dry ingredients and mix until just combined. Stir in the chocolate chips.
4. In a large microwave safe bowl, combine the caramels and heavy cream (or half & half). Microwave caramels on high until caramels are melted, stirring every 20 seconds. This will take about 2 minutes, depending on your microwave.
5. Divide the cookie dough in half. Press half of the cookie dough into the prepared pan, smoothing the top with the spatula. Pour hot caramel over the cookie dough. Sprinkle caramel with sea salt. Drop spoonfuls of cookie dough over the caramel and spread dough with a spatula until the caramel is covered. Sprinkle the bars with additional sea salt.
6.Bake cookie bars for 30 minutes or until the top of the bars are light golden brown and the edges start to pull away from the pan. Cool bars in the Pyrex dish. I left mine in the fridge overnight before cutting and serving.
Happy baking!
xo Lauren
PS – The winner of the Revlon giveaway is [drum roll please!]…Please send me an e-mail to claim your prize! Thank you to everyone who took the time to enter the Revlon Haute Tropics giveaway! If you weren’t the lucky winner, remember the Haute Tropics collection is in store for the next three weeks only – so what I am saying is don’t wait, these colours are too beautiful to pass up!
NOTE: I wrote everyone’s name down beside a number that entered and used the random number generator to select the winner.
Sometimes a healthy cookie just doesn’t measure up to the real deal. A few weeks ago I made “N’oatmeal Raisin Cookies” and I thought they were absolutely delicious – the verdict from my dessert loving friends and family: too healthy tasting. Since I am always subjecting my taste testers to healthy alternatives, even when they prefer the real deal, I figured it was time to treat them a little. These chewy, gigantic oatmeal raisin cookies did the trick – but don’t say I didn’t warn you when you can’t get your hand out of the cookie jar!
By now you probably know me well enough to understand two things – one, I like to turn unhealthy desserts into healthy ones, and two, I love adding veggies to dessert recipes. The zucchini bread satisfies both criteria and will trick even the most unhealthy eater into thinking they are indulging – if you decide to share.
Grain and Dairy Free Healthy Zucchini BreadIngredients
1 medium zucchini, shredded
6 eggs
1/2 cup melted coconut oil
1/3 cup honey
1 teaspoon vanilla extract
1 tablespoon pumpkin pie spice (or make your own using ginger, cloves and nutmeg)
1 tablespoon ground cinnamon
1 teaspoon baking soda
1/2 cup coconut flour
Directions
Preheat the oven to 350 F. Using a food processor with the grater blade or a cheese grater, shred the zucchini – do not remove the skin. In a large bowl combine all wet ingredients (zucchini, eggs, coconut oil, honey and vanilla extract) until well mix. Next add the dry ingredients and stir until well combined. Pour the batter into a well greased loaf pan [I use coconut oil to grease]. Bake for 40 minutes or until an inserted toothpick comes out clean. Allow to cool and enjoy!
There is nothing I like more than a simple, healthy and delicious recipe – and that is exactly what I am sharing with you today. Careful though, these blondies are extremely addictive.
Grain and Dairy Free Blondie Squares
Recipe slightly adapted from: The Detoxinista
Ingredients
1 cup natural creamy peanut butter
1/3 cup honey
1 whole egg 1/4 teaspoon sea salt (omit this if the peanut butter is already salted)
1/2 teaspoon baking soda
1/2 cup carob chips
Directions
Preheat oven to 350F and grease an 8″ square pan with coconut oil.
In a small bowl, mix the peanut butter, honey, egg, salt and baking soda until well combined.
Fold in carob chips.
Pour the batter into the greased pan, and use a spatula to smooth the top.
Bake for 20 minutes, or until the top is golden brown.
Remove from the oven, cool, cut into 16 squares and ENJOY!
I tested this recipe out a few weeks ago with every intention to share it – but then I totally forgot. Perhaps it slipped my memory because they disappeared as quickly as they were baked – these were [and I quote] “the best muffins ever” according to Neil. I didn’t try any because they contain both gluten and dairy [and sugar] but based on his reaction, the only downfall about these muffins is that a dozen in a batch isn’t nearly enough.
Muffin Batter
2 cups all-purpose flour
1 tsp baking powder
1/2 tsp baking soda
1/2 tsp salt
1 tsp ground cinnamon
1/2 tsp ground nutmeg
1/4 tsp ground cloves
8 tbs unsalted butter, at room temperature
1 cup sugar
2 eggs
1-1/2 tsp vanilla extract
1-1/2 cups chopped apples (I used Macintosh)
Streusel Topping
1/4 cup brown sugar, packed
1 tbs all-purpose flour
1/2 tsp ground cinnamon
1 tbs unsalted butter, cold
Directions
1. Preheat oven to 375. Grease twelve muffin cups.
2. For the streusel: In a medium-sized mixing bowl, mix together the brown sugar, flour and cinnamon. Using a fork, cut in the butter, until combined, forming small pea-shaped pieces. Set aside.
3. In a large mixing bowl, sift together the flour, baking powder, baking soda, salt, cinnamon, nutmeg and cloves until evenly combined. Set aside.
4. Using a stand-up or hand-held electric mixer, cream the butter and sugar together until light and fluffy, about two minutes. With the mixer on low-speed, slowly add the eggs, and then the vanilla until combined.
5. Stir the apples into the wet ingredients. Slowly add the apple-mixture to the dry ingredients and stir to combine. The batter will be very thick.
6. Spoon the batter into the prepared muffin tins and top with a sprinkling of the streusel mix. Bake for 18-20 minutes until golden brown and a cake-tester comes out clean. Allow the muffins to cool for five minutes in the muffin tin before removing and cooling on a baking rack. Serve warm.
I would assume you can store these in an air tight container for at least a week and subsequently in the fridge, however, the batch I made didn’t even come close to lasting that long.
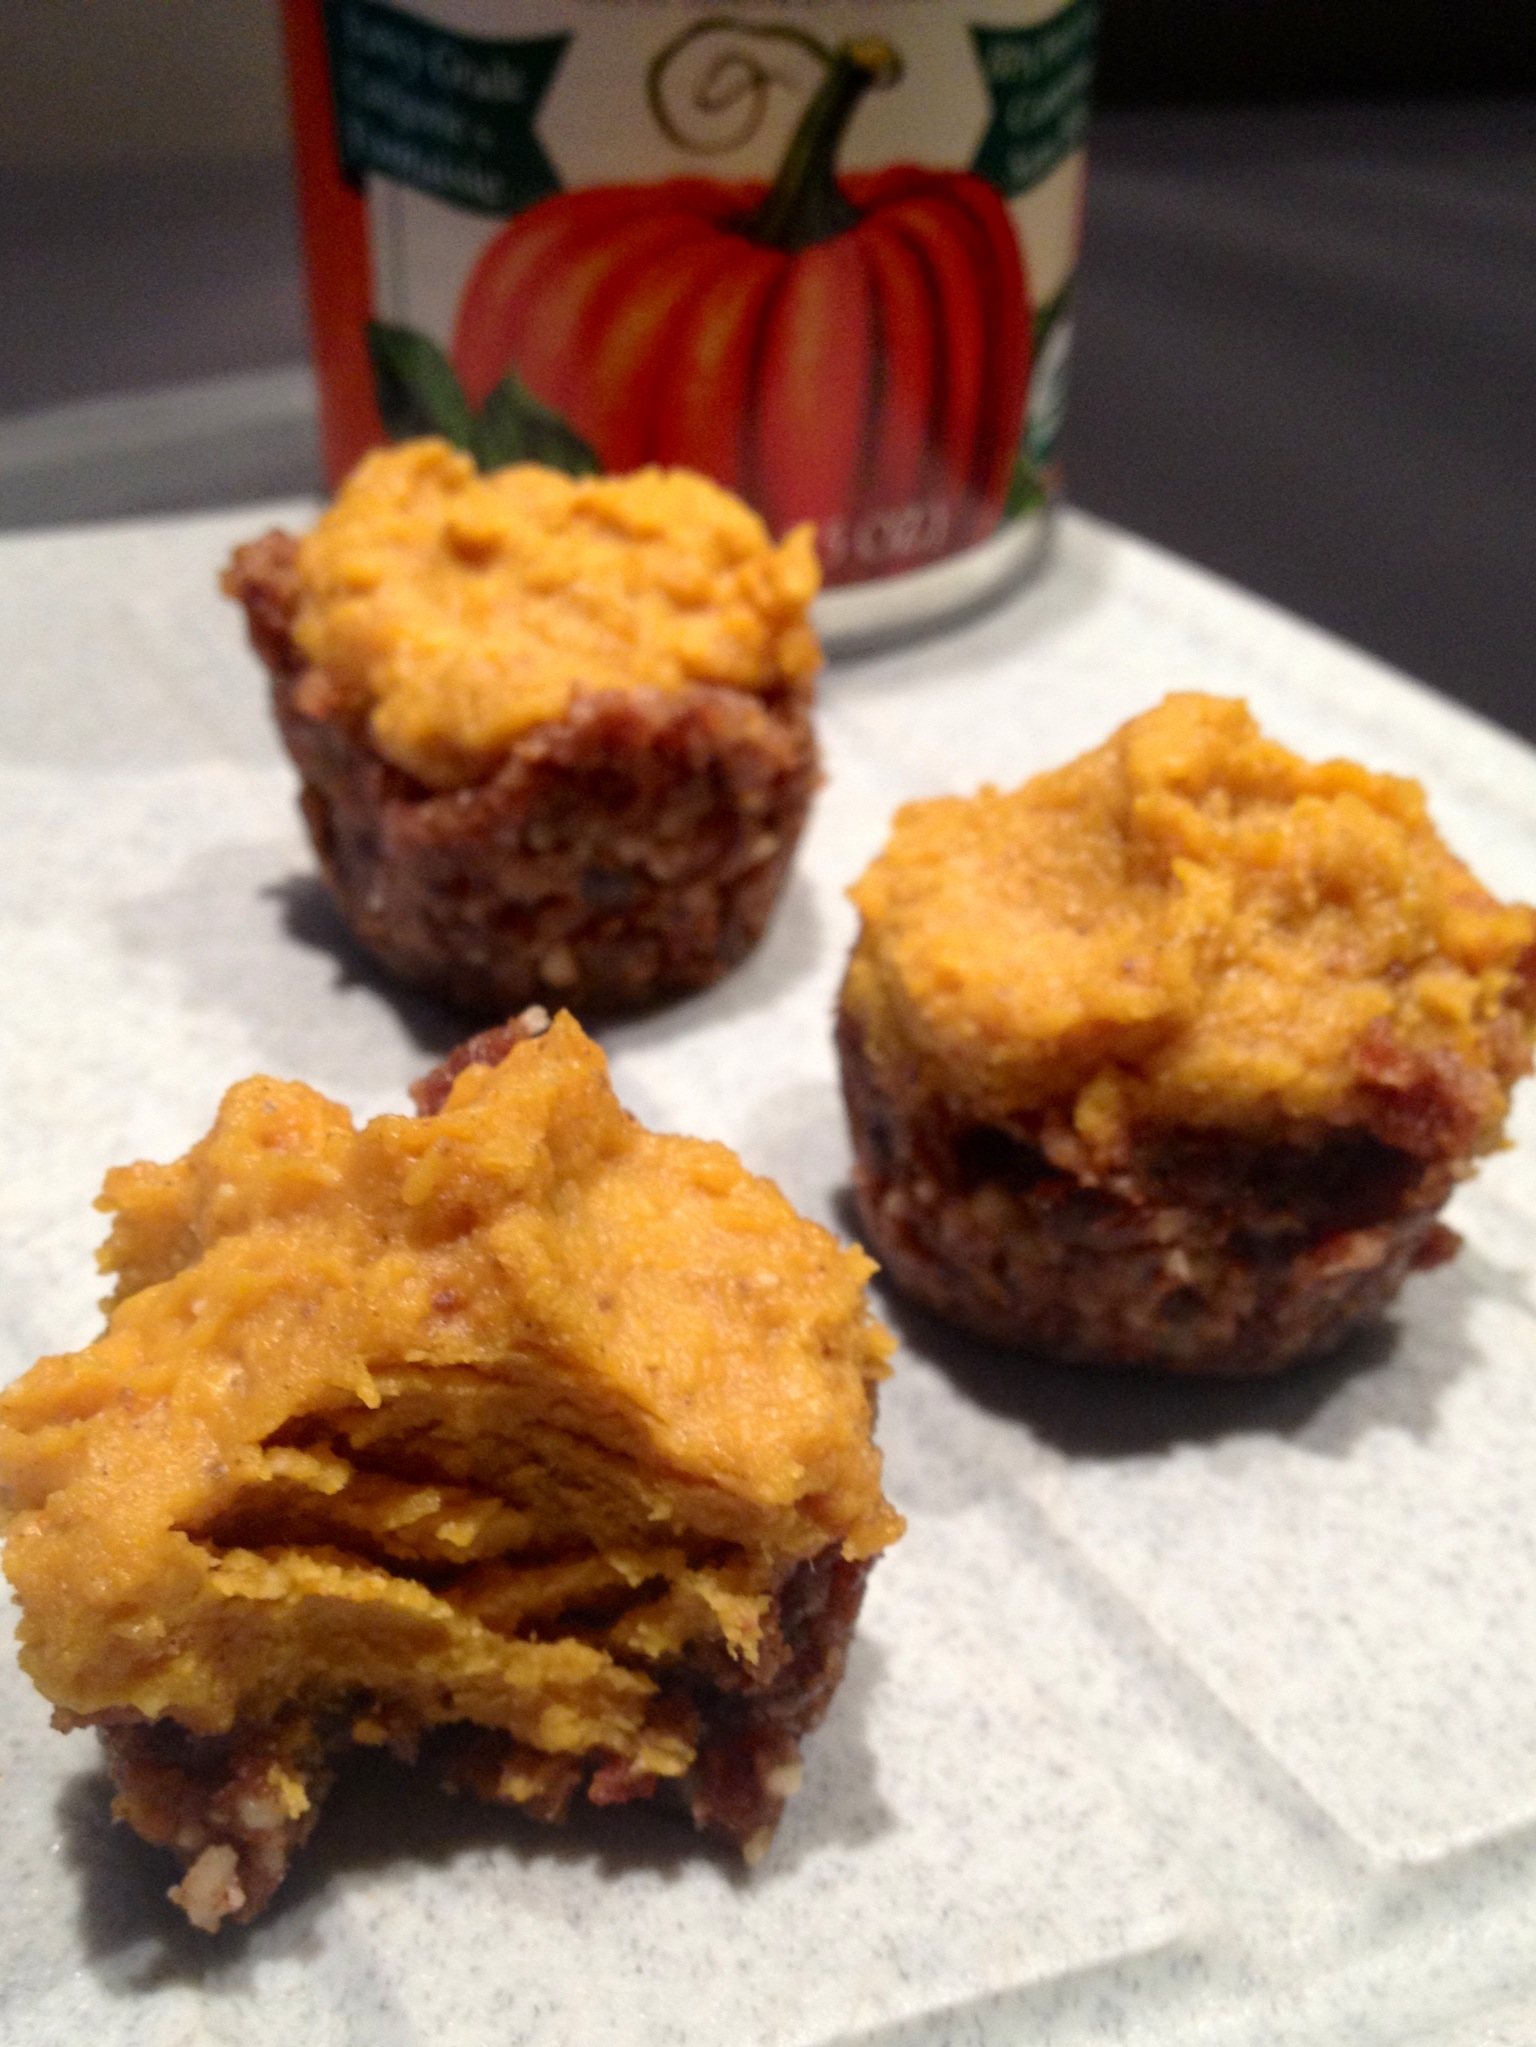
I am really sharing this recipe at an odd time of the year. Pumpkin season has long passed, but I just couldn’t resist bringing it back to make these tiny, tasty treats. Luckily, pumpkin puree is quite easy to find year round at most natural food stores so you can make these no bake pumpkin bites too! Oh and they are healthy – not that you could tell by tasting them.
Crust:
1 lightly packed cup cooking dates
2/3 cup raw pecan (or walnut) halves
1/2 tsp ground cinnamon
Filling:
2 tbsp coconut butter (not oil) at room temperature
1/2 cup 100% cooked pumpkin puree at room temperature
2 Tbsp pure maple syrup, preferably grade B
1/2 tsp pure vanilla extract
1/2 tsp ground cinnamon
1/4 tsp ground ginger
1/8 tsp ground nutmeg
1/8 tsp ground cloves
Directions
In a food processor, combine nuts, dates and cinnamon. You may want to put the dates in first and pulse a bit to chop them. Process until mixture becomes crumbly which should take about a minute. Remove from food processor.
In a bowl, combine coconut butter and pumpkin puree. Make sure that both are at room temperature – if not the coconut butter will become too solid and will not mix well. If this happens, microwave the mixture for no more than 20 seconds.
Add the remaining ingredients to the pumpkin and coconut butter mixture and stir until it is very smooth.
Divide the crust evenly among 12 cups of a mini muffin tin.
Using a wet finger press the crust into the tin and make an indentation in each.
Fill each indentation with the pumpkin filling.
Place the muffin tin in the fridge for at least two hours or until firm.
Just a warning. These little bites are extremely stubborn to remove from the muffin tin. I found the best method to coerce them out was to use a toothpick to loosen them around the outer edge, then pop them out. As long as they are firm they will not fall apart.
Store in an air tight container in the refrigerator.
I know it is only mid November, but is anyone else starting to get into the holiday baking spirit? Last night [a non convicted] Martha Stewart took over my body and I spent the evening baking my famous ginger cookies
Big Soft Ginger Cookies
for my favourite people – and who am I kidding, I made some treats for myself too! The recipe I’m going to share with you has a secret ingredient that makes them healthy and filling. I know it is going to sound a bit strange but just trust me on this one – I’m seriously becoming the queen of “weird” recipes among my friends. Everyone I have shared these cookies with went back for seconds – that is how delish they are – especially right out of the oven when the chocolate is gooey, like this:
Ooey Gooey Chocolate!!!
Okay, so here is the secret – chickpeas [SAY WHAT?!]. Seriously. The base of the cookie is made from chickpeas. Enough anticipation, here is the recipe!
1 can of chickpeas, rinsed and patted dry with paper towel
2 teaspoons of pure vanilla extract
1/2 cup + 2 tablespoons of natural almond butter (I used raw)
1/4 cup honey
1 teaspoon baking powder (look for a gluten free brand if necessary)
a pinch of salt
80g of dark chocolate (I used a full chocolate bar minus 2 big squares – you can use more or less depending on how chocolatey you like your cookies)
What to do:
What a mess!
Preheat the oven to 350 degrees and line a cookie sheet with parchment paper [this will save you a lot of clean up]. Add all of your ingredients (except for the chocolate) into a high powered food processor and blend until smooth and creamy. Even though this mixture doesn’t have any egg and is safe to eat raw I don’t recommend doing so. The batter uncooked tastes pretty brutal – they will get better though, save yourself the disappointment and wait a few more minutes to taste your creation!
Next you’ll have to smash the chocolate into smaller pieces. I use the term “smash” because I literally take a hard spatula and hit the chocolate until it breaks into smaller chunks – I should have taken a video, it is beyond ridiculous, but it is a great way to let out some aggression and it is lots of fun! Once the chocolate is broken into pieces add it to the food processor and pulse quickly once or twice just to mix it in.
Adding the “smashed” chocolate pieces!
You should end up with a mixture that is sticky and a bit slimy [awful way to describe cookies] so you’ll want to use a spoon to transfer the batter into 12 cookies on your lined cookie sheet. These cookies don’t change much in size at all when baked so keep that in mind. I press down on the ball just a bit so they aren’t as puffy. It should look something like this:
Bake for 10 minutes – or a bit longer if you want a bit of crunch, these cookies are very chewy.
Baked Cookies.
They look pretty much the same except you can see the melted chocolate chunks inside and the browned edges! Wait about 5 minutes [if you have any self-control] and dig in while they are still warm!
You can’t even tell that these are healthy cookies, they are so good – this is the 4th batch I’ve made in the past three weeks.
And for your friends and family that are sick of your healthy treats – make them some ginger cookies, they’ll be happy – and that will keep them away from your healthy but delicious desserts [insert evil laugh here]!
Big Soft Ginger Cookies! You can find the recipe on the blog.
Today is my birthday and I am so lucky to have two of my best friends join me from Toronto to celebrate. The least I could do to thank them for flying in to see me was to bake them a little treat! These black bean brownies were such a hit that I thought it would be a great idea to share with you!
Don’t be fooled by the name – these brownies are really delicious. A girlfriend of mine who refuses to mix healthy with dessert went back for seconds.
What you will need:
1 19oz (540ml) can black beans, well rinsed and drained – make sure you rinse them really well… trust me.
3 large eggs
3 tbsp coconut oil
1/4 cup cocoa powder
2/3 cup maple syrup or agave nectar
1 tsp baking powder
1/4 tsp salt
1 tsp pure vanilla extract
1 tsp instant espresso
Ingredients
Step 1: Pre-heat the oven to 350F. Add all ingredients into the Cuisinart/blender. Easy right. Looks a little something like this.
Ingredients in the food processor ready to be mixed.
Step two: Pour into a lightly greased dish. I grease with coconut oil but feel free to use any oil or butter. I find these brownies bake best when using an 8 x 8 glass dish.
Delicious batter ready to put in the oven
Step 3: Bake for 30 – 32 minutes.
After 30 minutes in the oven.
Now comes the hard part. Because these brownies are so moist, you have to wait at least an hour before cutting into them or else they will crumble. If you put them in the fridge it will speed up the process a bit – just trust me on this one, wait it out – you will be much happier with the results.
After the longest hour of your life, serve and enjoy!
Finished product - delicious black bean brownies
I usually cut them into 12 squares. Don’t judge but here is what was left after the four of us got to them.
Almost all gone... I guess this means I need to bake some more!
Try them for yourself – I dare you. You’ll never want your beans prepared any other way! Leave me a comment to let me know how yours turned out!

 Ingredients