A 5'3 Perspective


1 Comment

What I Ate Wednesday, Plus A Peanut Butter Chocolate Chip Cookie Dough Recipe

By the time you read this I will be driving the highways of Ontario with my man to visit friends and family in my favourite Canadian city – Toronto! Just because I’m on vacation, doesn’t mean I’m leaving you high and dry – I’m just shifting things a little, instead of sharing what I ate Wednesday, I’m showing Tuesday’s eats! No big deal right? Didn’t think so, but if it does bother you, scroll down, I have an awesome peanut butter chocolate chip cookie dough energy bite recipe to share to make up for it! You’re welcome ;).WIAW

Breakfast – This is my favourite meal ever. Yes, ever. Egg white omelette with spinach and goat cheese, topped with homemade guacamole [avocado, lime juice, salt and pepper], with a side of sweet potato pieces. In the background you can see Neil’s french toast and cherries! Oh and don’t forget the Second Cup French Vanilla flavoured coffee!
Snack – A juicy Ontario peach.
Lunch – Not the best looking meal, but it sure tasted great! Salmon, broccoli and sweet potato [yes I am on a yam bender today].
Snack – Typical veggies in a Zip-lock baggy.
Dinner – A salad beast! Lettuce, fresh blueberries, grilled chicken, goat cheese and candied walnuts [walnuts tossed in maple syrup and heated on the stove], topped with Cranberry – Pear White Balsamic from The Unrefined Olive in Ottawa. If you love olive oils and balsamic vinegars, this spot is a must visit!
Dessert – PEANUT BUTTER, CHOCOLATE CHIP, COOKIE DOUGH balls! Yes I have been on a “bite” creating bender – this recipe is the easiest one yet.

Here is what you need: 
1/4 cup coconut flour
1/3 cup almond meal
1/3 cup peanut butter
2 tbsp honey
1 tbsp softened coconut oil
splash of vanilla
1/4 cup chocolate chips

Directions:
In a large bowl, combine all ingredients, except for the chocolate chips. Once the mixture is uniform, fold in the chocolate chips. Roll into approximately 10 balls and place on wax or parchment paper. Place in the freezer for at least half an hour to harden.

You can serve these delicious bites straight from the freezer. Otherwise – store them in the fridge, they will not keep if they are left out. Keep that in mind if you are bringing them to work for lunch…. or maybe just don’t bring them – I learned the hard way.

Happy hump day friends!

xo Lauren


1 Comment

What I Ate Wednesday [And A Recipe]

Remember when I promised to share the recipe for those coconut lemon balls I raved about? Well I’ve tweaked them just a tiny bit over the week and decided that they are ready to be revealed, but first, let’s take a sneak peek into my photo food diary. WIAW

Breakfast – Green [Brown] Smoothie. During the summer months I always crave something cold and refreshing for breakfast. To make this beast of a smoothie I used about a cup of frozen berries, a huge handful of spinach, a scoop of protein powder and water.
Snack – Goat Yogurt with blueberries and pecan pieces.
Lunch – Zucchini noodles with tomato sauce.
Snack – A big bag of veggies. This is my go to afternoon snack, usually consisting of carrots, cucumber and cherry tomatoes.
Dinner – Steak, a couple pieces of chicken, roasted asparagus and zucchini, and homemade sweet potato fries.
Dessert – Coconut Lemon Goji Balls!! As promised – head over to I’m Fit Possible, where Tara was lovely enough to host me as a guest, to see my recipe.

Have a lovely day friends!

xo Lauren


8 Comments

What I Ate Wednesday [And A New Breakfast Recipe]

Lately it feels as though I have been going grocery shopping on a daily basis but rarely have any meals to make. Over the past week I have been using the clean out the fridge mentality. For today’s What I Ate Wednesday, I unintentionally went with a meatless theme as well – which is very atypical for me. I also came up with a delicious and simple new breakfast recipe – banana, egg white and oat pancakes – the name says it all but I’ll share the specifics at the end of this post! WIAW

Breakfast – Healthy Pancakes [scroll down for the recipe] topped with fresh blueberries.
Snack – A handful of almonds.
Lunch – Homemade bento box of cucumber, hard boiled eggs, lactose free cheese, yellow pepper and hummus.
Pre-workout Snack – Goat yogurt with blueberries and pecan pieces.
Dinner – Grain free, vegetarian enchiladas

Recipe: Veggie Filled, Meatless, Grain-Free Enchiladas

.
Dessert – Lemon Coconut Balls – I’ll share the recipe for these soon, I promise!

On weekdays, my go to breakfast consists of either egg whites and spinach, or goat yogurt and berries – but lately I have been feeling so uninspired by the choices. Last week I came up with a new and extremely simple pancake recipe that I have been cooking non stop – it even gets the boyfriend seal of approval!

Banana, Egg White, Oat Pancakes

Ingedients
1 ripe banana
3/4 cup gluten free oats
1/3 cup egg whites
cinnamon [use as much or as little as you like]
dash of vanilla

Directions
Mix all ingredients in a large bowl until well combined. Cook on a skillet/pan as you would a typical pancake. For me it takes approximately 2 minutes per side, sometimes less.

What was the best thing you made or ate this past week? Did you try any new recipes?

xo Lauren


2 Comments

What I Ate Wednesday

If you follow any full fledged healthy living blogs, you’ve likely seen this type of post a million times. If not, here is a quick run down – What I Ate Wednesday, also known as WIAW, was started as a once a week food diary which allowed people [healthy living bloggers] to show off their beautiful and nutritious meals through pictures. Since then, WIAW has transformed into a weekly social event for bloggers worldwide.

Although I have been hesitant to join the movement since I know people will compare their diets to mine, but that isn’t the point. I love reading What I Ate Wednesday posts from others because it gives me new recipes and meals to try – that is the reason I am sharing my eats with you. This is a pretty typical day for me, except for dinner… that was a bit of a splurge, but totally worth it!

Thanks to Jenn of Peas and Crayons for hosting this Wednesday party!WIAW

Breakfast – Tea and Oats In A Jar, made using gluten free oats, unsweetened almond milk, chia seeds, cinnamon, strawberries, pecan pieces and stevia].
Snack – Big container of veg!
Lunch – Baked Salmon, Sweet Potato and Broccoli with a bit of lemon juice.
Snack – White Chocolate Raspberry Quest Bar – one word – UNREAL.
Dinner – Homemade Gluten Free Pizza Chicken Pizza with Spinach, Roasted Red Peppers, Broccoli, and Lactose Free Cheese.
Dessert – A Maple Coconut Ball. When these bad boys are in my fridge, I just can’t resist.

Happy hump day friends!

xo Lauren


2 Comments

Make Your Own: Farm Boy Lemon Garlic Salad Dressing Recipe

Sometimes I find myself wondering if I could make some of the items I buy from the grocery store. Lately I have been obsessed with the Farm Boy Lemon Garlic salad dressing. I love that is it all natural, has very few ingredients and doesn’t include sugar. It is the perfect compliment to a salad and it can even be used to marinade chicken or fish. But best of all – it only has five simple ingredients, probably ones that you already have on hand at home. This recipe will take you less time to make than it would to find a bottle in the store.Make Your Own Farm Boy Lemon Garlic salad dressingWhat You’ll Need

Lemons
Olive oil
Salt and pepper
4-6 Cloves of garlic

First, mince the garlic (don’t be shy, use lots – that is what makes this dressing so delicious) and add it to a mason jar or container. I used an old bottle that contained the store bought dressing! Next add equal parts lemon juice and olive oil to fill the container. Finish with a dash of salt and pepper. I used about a teaspoon of pepper and 1/2 a teaspoon of salt, but you can adjust the amounts to suit your palate. Seal the jar and shake well. I prefer to leave the dressing overnight to deepen the flavours. Shake before serving and enjoy!

Doesn’t really get any easier than that!

xo Lauren


3 Comments

Healthy Avocado Fries

There was a time in my life when you couldn’t convince me to touch avocado with a ten-foot-pole. The green, slimy, fruit/vegetable was foreign to me and frankly – it looked absolutely disgusting. Then I tried it. And my life was changed forever – bring on the mushy green stuff – I’m obsessed. Sometimes I buy more avocado than I know what to do with, which leads to invention. Today’s creation is an absolutely winner – a bit strange, but amazing:

Avocado FriesAvocado FriesIngredients

2 ripe avocados

1/4 cup egg whites

1/2 cup almond meal

salt and pepper to taste

Directions

Pre-heat the oven to 350F. Slice the avocados into fry like shapes. Put the egg whites in a small bowl and season with salt and pepper. On a plate, lay out the almond meal. Dip each piece of avocado piece into the egg white wash and then into the almond meal and cover thoroughly. Place each coated avocado fry onto a tin foiled lined baking sheet. Bake for 25 minutes, flipping halfway. Remove from the oven and enjoy.

I served mine with a greek yogurt/Sriracha combination [you could also use a mayo/Sriracha mix] as a dipping sauce.

Happy Cooking!

xo Lauren


Leave a comment

Cheese-less, Cheesy Kale Chips

If you haven’t tried kale yet, you are likely in the minority. This dark leafy green has become one of the most popular vegetables over the past few months – but not without reason, the benefits of the green stuff are endless. Kale is believed to protect against cancer and significantly lower cholesterol if eaten regularly. Additionally, it is packed with vitamins A, C, and K, all of which are antioxidants. Beyond antioxidants, the fiber content of cruciferous kale binds bile acids and helps lower blood cholesterol levels and reduce the risk of heart disease, especially when kale is cooked instead of raw (WebMD).

So now you’re probably thinking – how do I incorporate this into my daily diet? It is easier than you might think. An easy swap would be to use kale instead of [or in addition to] other greens as a salad base – sounds simple right? It is, however, you’ll want to massage your kale first to turn it from bitter and tough to silky and sweet. All you need to do is take bunches of kale in both hands — with the fibrous ribs removed — rub them together and repeat. You’ll notice a visible change as you do this; the leaves will darken, shrink in size and become silky in texture. This means the cellulose structure is breaking down. So you salad will take an extra five minutes to make, not the end of the world though. If you don’t have time to massage your kale – try throwing into a smoothie. As long as your blender is strong enough it will breakdown completely and you won’t even know it is there. If you’ve got a few extra minutes to spare, I highly recommend baking your kale and turning it into chips. This is my favourite snack, I always feel so naughty eating them because they taste too good to be true. You can find pre-made kale chips in many grocery stores and health food markets, however, the price tag on the crunchy treats are through the roof. For convenience they are a great option, your wallet on the other hand will hate you. Also, many of the store-bought brands contain added sugar, the recipe I am about to share with out doesn’t require any.  Rest assured, there is nothing even remotely unhealthy about these chips – so dig in, guilt free.

Cheese-less, Cheesy Kale Chips

Inspired by: The DetoxinistaCheese-less Cheesey Kale ChipsIngredients

One large bunch of curly green kale (preferably organic)
1 cup raw cashews, soaked for 2 hours
1/4 cup + 1 T. water
3 T. fresh lemon juice
3T. nutritional yeast
1 tsp. chili powder
1/2 tsp. garlic powder
1/2 tsp. sea salt

Directions

Pre heat the oven to 350F and line two baking sheets with parchment paper. Wash the kale and tear it into bite sized pieces. Dry each piece well. The drier they are, the crispier the chips will end up. Put the pieces in a large bowl and set aside.
Combine the rest of the ingredients using a high powered blender.
Once well combined, add the sauce to the bowl of kale and mix well with your hands. You want to make sure each piece of kale is coated in sauce.
Spread the kale onto the parchment paper –  I like to split it between to baking sheets – and bake for 15 – 20 minutes. Once the pieces start to turn brown on the edges, they are done.

You can store the chips in an air-tight container in the fridge – if you have any left. These kale chips don’t last long in my house!

Have you ever tried using kale? I’d love to hear some of your favourite recipes or uses!

xo Lauren


Leave a comment

Boyfriend Approved: Grain and Lactose Free Carob Chip Muffins

I’ll admit it, I’ve been on a complete baking tear these days. Usually when this happens, about 50% of the recipes I make turn out to be worthy of adding to me repertoire. This time, I have yet to find a miss, everything has been absolutely delicious. These muffins are no exception – and I know they are great because Neil was disappointed when we ran out!

Grain and Lactose Free Carob Chip Muffins

Inspired by: Living Healthy With ChocolateGrain and Lactose Free MuffinsIngredients

3/4 cup almond butter
1/4 cup peanut butter (you can use 100% almond butter instead)
3 tablespoons honey
2 eggs
½ teaspoons vanilla extract
1 teaspoon apple cinder vinegar
½ teaspoon baking soda
¼ cup unsweetened carob chips (or chocolate chips)

Directions

Preheat the oven to 350°F.
Mix the honey, eggs, vanilla, apple cinder vinegar and baking soda in a bowl.
Add the almond butter and peanut butter and mix well. Fold in the carob chips.
Spoon batter into nine paper lined muffin cups or a silicon muffin tin and bake for about 25 minutes or until a toothpick inserted into the center comes out clean.
Allow time to cool before serving.
Serve and enjoy!

Another easy as can be, healthier recipe!

xo Lauren

PS – Don’t forget to enter the Revlon Haute Tropics nail polish giveaway!!


2 Comments

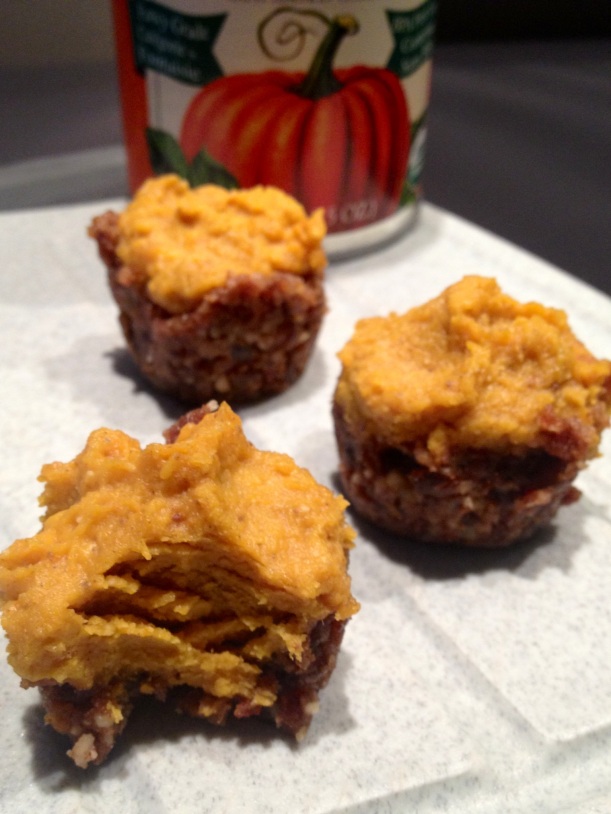
No Bake Pumpkin Bites

I am really sharing this recipe at an odd time of the year. Pumpkin season has long passed, but I just couldn’t resist bringing it back to make these tiny, tasty treats. Luckily, pumpkin puree is quite easy to find year round at most natural food stores so you can make these no bake pumpkin bites too! Oh and they are healthy – not that you could tell by tasting them.

No Bake Pumpkin Bites

Recipe from: Cara’s Cravings

No Bake Pumpkin Bites

Ingredients

Crust:
1 lightly packed cup cooking dates
2/3 cup raw pecan (or walnut) halves
1/2 tsp ground cinnamon

Filling:

2 tbsp coconut butter (not oil) at room temperature
1/2 cup 100% cooked pumpkin puree at room temperature
2 Tbsp pure maple syrup, preferably grade B
1/2 tsp pure vanilla extract
1/2 tsp ground cinnamon
1/4 tsp ground ginger
1/8 tsp ground nutmeg
1/8 tsp ground cloves

Directions

  1. In a food processor, combine nuts, dates and cinnamon. You may want to put the dates in first and pulse a bit to chop them. Process until mixture becomes crumbly which should take about a minute. Remove from food processor.
  2. In a bowl, combine coconut butter and pumpkin puree. Make sure that both are at room temperature – if not the coconut butter will become too solid and will not mix well. If this happens, microwave the mixture for no more than 20 seconds.
  3. Add the remaining ingredients to the pumpkin and coconut butter mixture and stir until it is very smooth.
  4. Divide the crust evenly among 12 cups of a mini muffin tin.
  5. Using a wet finger press the crust into the tin and make an indentation in each.
  6. Fill each indentation with the pumpkin filling.
  7. Place the muffin tin in the fridge for at least two hours or until firm.

Just a warning. These little bites are extremely stubborn to remove from the muffin tin. I found the best method to coerce them out was to use a toothpick to loosen them around the outer edge, then pop them out. As long as they are firm they will not fall apart.

Store in an air tight container in the refrigerator.

Happy [no] baking!

xo Lauren


1 Comment

Peanut Butter Cookies That You Can Eat For Breakfast!

Who doesn’t love cookies for breakfast?! I know I do – but the thought of dessert to start the day makes me feel ever-so guilty. What if you could indulge without that feeling? This raw, vegan, gluten free recipe is the answer to your cookie prayers.

A healthy treat that you can feel good about devouring!

A healthy treat that you can feel good about devouring!

Salted Peanut Butter Cookies

Adapted from: A House In The Hills

raw vegan PB cookies

Ingredients

  • 1 cup of pitted dates (roughly chopped)
  • 1/2 cup natural peanut butter (just peanuts)
  • Slightly less than 1 cup of almond flour (or 1 cup of almonds ground into flour)
  • 1 tsp vanilla
  • coarse sea salt

Directions

  1. Combine all ingredients (except for the salt) in a food processor and blend until a dough like consistency is formed. This is take about 5 minutes. It is okay if you still have a few larger pieces of dates. I would not recommend attempting this recipe if you do not have  a food processor or an extremely high power blender.
  2. Remove dough and roll into 12 balls. Flatten each one (with a fork if you want the traditional PB cookie look)
  3. Sprinkle generously with coarse sea salt.
  4. Refrigerate for at least 2 hours.
  5. Enjoy.

These cookies are best stored in the fridge.

Happy (heat-less) baking!

xo Lauren