A 5'3 Perspective


Leave a comment

A Chewy, Can’t-Just-Eat-One, Oatmeal Raisin Cookie Recipe

Sometimes a healthy cookie just doesn’t measure up to the real deal. A few weeks ago I made “N’oatmeal Raisin Cookies” and I thought they were absolutely delicious – the verdict from my dessert loving friends and family: too healthy tasting. Since I am always subjecting my taste testers to healthy alternatives, even when they prefer the real deal, I figured it was time to treat them a little. These chewy, gigantic oatmeal raisin cookies did the trick – but don’t say I didn’t warn you when you can’t get your hand out of the cookie jar!

Chewy, Can’t-Just-Eat-One, Oatmeal Raisin Cookies

Recipe from: Little Bites of EverythingOatmeal Raisin CookiesIngredients

1 ¾ cup flour
½ tsp salt
1 tsp baking soda
½ tsp cinnamon
2 sticks butter, room temperature
1 cup sugar
1 cup dark brown sugar
2 eggs
1 tsp vanilla extract
2 ½ cup rolled oats
1 ½ cup raisins
Directions
Preheat oven to 350 degrees.
Combine flour, baking soda, cinnamon and salt and mix using a fork.
In another larger bowl, beat (using an electric beater if you have one) the butter, vanilla, granulated sugar and brown sugar until combined.
Add in the eggs to the sugar and butter mixture and beat to combine.
Next add the dry mixture to the wet ingredients little by little while mixing.
Fold in the oats and then the raisins.
Make balls out of the dough, about 2 inches thick and place on baking sheet, about 4-6 at a time.
Lightly flatten each ball slightly and bake for about 10-11 minutes.
Leave the cookies on the baking sheet for about 10-12 minutes to finish cooking outside of the oven and then place on a cooling rack.
Serve and enjoy!

Happy [hearty] baking friends!
xo Lauren


Leave a comment

Rice Free Sushi

I never thought the day would come that I would be making homemade sushi, it always seemed like such a complicated and time consuming process, but rice-less sushi, that is another story. You can whip up a few rolls in under 10 minutes and add a few extra veggies to your meal without even realizing.

Last week I share my [second] cauliflower crust pizza recipe with you, today on the menu: cauliflower “rice” sushi for one, or you can double, or triple the recipe if you feel like sharing.

Rice-less SushiRice Free Smoked Salmon and Avocado Sushi

Ingredients

– half a medium head of cauliflower

– 3 pieces of roasted nori

-3 slices of smoked salmon [you should use sushi grade salmon instead]

– half an avocado

– 1/3 cucumber

– rice wine vinegar

– tamari sauce for dipping [or soy sauce if you can eat gluten]

Directions

1. In a food process, pulse the cauliflower until you achieve a rice like texture.

2. Microwave the cauliflower rice for 4 or 5 minutes depending on your microwave.

3. Allow the rice to cool completely before squeezing the moisture out using a cheese cloth or a light dish towel. I usually do these steps the day before I make my sushi.

4. Add a few splashes of rice vinegar to your cauliflower rice and mix well. Taste as you go.

5. Lay the three pieces of nori on a flat dry surface and fill with remaining ingredients. Make you slice the avocado and cucumber thinly. I find it best to start with the “rice” then layer the veggies and fish.

6. Roll the nori up and wet your fingers just a bit to seal the end to the roll. Slice with a sharp knife and serve chilled.

It ain’t all you can eat, but it sure is delicious [and extra healthy].

xo Lauren


Leave a comment

Cauliflower Crust Pizza – Second Time’s The Charm

Sometime last year I shared a recipe for cauliflower crust pizza with you. This healthy pizza alternative had taken the Internet world by storm, however, it always seemed to need tweaks or improvements. It was impossible to eat the pizza using your hands and the texture was just too vegetable like. Recently, I’ve noticed that the buzz is back, new recipes are starting to pop up all over the web. I decided it was time to give this healthy pizza dough another try. This time, things were different! It was much less time consuming and challenging to make and the pizza was actually tough enough to be held and eaten, instead of using a fork and knife! Disregard my previous recipe, this one will blow it out of the water and take half the time!

New and Improved Cauliflower Crust Pizza

Inspired by: The Vintage Mixer

20130515-224407.jpg
Ingredients
1/2 small head of cauliflower, leaves and stems removed
1 teaspoon basil
1 teaspoon oregano
1 teaspoon parsley
1 teaspoon salt
1/4 cup of hard goat cheddar
1 egg

Directions
1. Preheat the oven to 350 F.
2. Pulse the cauliflower in a food processor until you achieve a rice like texture.
3. Combine the raw riced cauliflower with the rest of the ingredients. Mix well and don’t be Adria’s to use your hands.
4. On a parchment paper lined baking sheet, form a pizza crust approximately 1/4 inch thick.
5. Bake at 350 F for 20 minutes.
4. Increase the oven temperature to 400 F and cook for another 10 minutes.
5. Cover the pizza with toppings of your choice and bake for 5 more minutes to melt the cheese. I topped my pizza with pure tomatoes as sauce, sauteed zucchini, broccoli and mushrooms and some goat cheddar. It was delicious.

This recipe serves one hearty meal. You can double it to make a larger pizza to share.

Enjoy!
xo Lauren


2 Comments

No Bake Pumpkin Bites

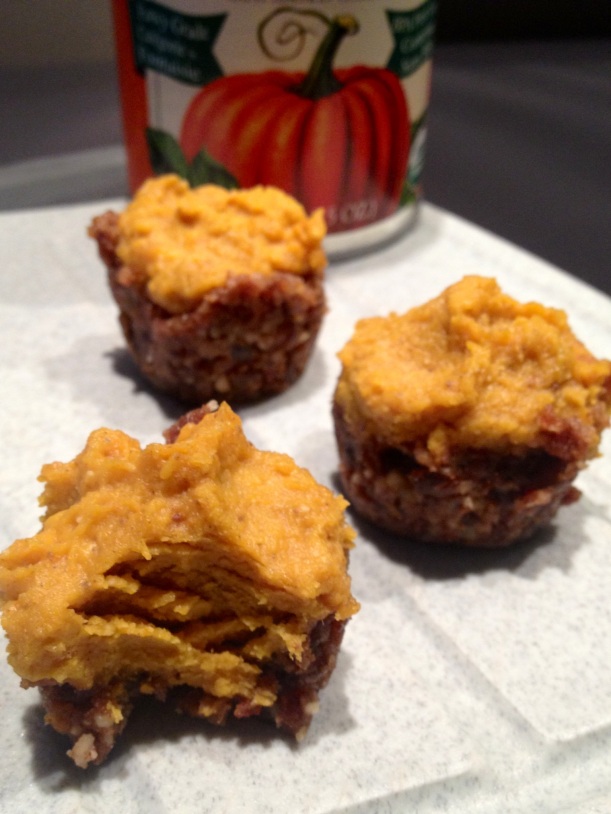
I am really sharing this recipe at an odd time of the year. Pumpkin season has long passed, but I just couldn’t resist bringing it back to make these tiny, tasty treats. Luckily, pumpkin puree is quite easy to find year round at most natural food stores so you can make these no bake pumpkin bites too! Oh and they are healthy – not that you could tell by tasting them.

No Bake Pumpkin Bites

Recipe from: Cara’s Cravings

No Bake Pumpkin Bites

Ingredients

Crust:
1 lightly packed cup cooking dates
2/3 cup raw pecan (or walnut) halves
1/2 tsp ground cinnamon

Filling:

2 tbsp coconut butter (not oil) at room temperature
1/2 cup 100% cooked pumpkin puree at room temperature
2 Tbsp pure maple syrup, preferably grade B
1/2 tsp pure vanilla extract
1/2 tsp ground cinnamon
1/4 tsp ground ginger
1/8 tsp ground nutmeg
1/8 tsp ground cloves

Directions

  1. In a food processor, combine nuts, dates and cinnamon. You may want to put the dates in first and pulse a bit to chop them. Process until mixture becomes crumbly which should take about a minute. Remove from food processor.
  2. In a bowl, combine coconut butter and pumpkin puree. Make sure that both are at room temperature – if not the coconut butter will become too solid and will not mix well. If this happens, microwave the mixture for no more than 20 seconds.
  3. Add the remaining ingredients to the pumpkin and coconut butter mixture and stir until it is very smooth.
  4. Divide the crust evenly among 12 cups of a mini muffin tin.
  5. Using a wet finger press the crust into the tin and make an indentation in each.
  6. Fill each indentation with the pumpkin filling.
  7. Place the muffin tin in the fridge for at least two hours or until firm.

Just a warning. These little bites are extremely stubborn to remove from the muffin tin. I found the best method to coerce them out was to use a toothpick to loosen them around the outer edge, then pop them out. As long as they are firm they will not fall apart.

Store in an air tight container in the refrigerator.

Happy [no] baking!

xo Lauren


4 Comments

Walnut & Sweet Potato Biscuits

2013 – boy does time fly! Hopefully you had a great time ringing in the new year and spending time with your loved ones – I know I did.

What better way to start the year than a new recipe. Yesterday I spent a lot of time in the kitchen fooling around with ingredients. I had a few recipes bookmarked that I was dying to try but didn’t have the necessary ingredients. What’s a girl to do when EVERYTHING is closed?! Substitute. But really – do I ever follow a recipe as written? Luckily this time my baking turned out great, so now I can share it with you!

If your New Year’s resolution is to eat better and get into shape, I would recommend whipping up a batch of these Walnut and Sweet Potato Biscuits – they are lactose, gluten and sugar free [crazy right?!] and pass the boyfriend taste test. Oh and they are so simple to make as long as you have a food processor or blender.

Walnut & Sweet Potato Biscuits

Inspired by: A Dash of Megs’ Sweet Potato Biscuits

Gluten Dair Sugar Free Walnut and Sweet Potato Biscuits

Ingredients

1 large baked sweet potato

2 tbsp coconut flour

1/2 cup egg whites

1 cup walnut pieces

1/4 cup fat free greek yogurt (naturally lactose free)

1 tsp baking powder

2 tbsp almond coconut milk

1 tsp cinnamon

2 droppers full of liquid stevia

pinch of salt

Directions

1. Preheat oven to 350F.

2. Grind 1 cup of walnut pieces in the food processor until it becomes a crumble like texture. This takes between 45 seconds to a minute.

3. Add the remaining ingredients into the food processor and mix until a smooth batter forms.

4. Drop batter onto a parchment paper lined baking sheet. I was able to make 9 biscuits from this mixture.

5. Bake for 20 – 25 minutes or until the tops have browned just slightly.

6. Allow to cool and enjoy!

Healthy Treats

These biscuits are really tasty and moist have good crumb. They melt in your mouth!

If you’re interested in the nutritional information for these biscuits [1 serving = 1/9th of the batter] here it is:

Calories: 121 / Carbohydrates: 9g / Fat: 8g / Protein: 7g / Sodium: 42mg / Sugar: 3g

Now that is a good looking nutritional profile – eat up!!!

What have you been baking lately? Any healthy treats?


3 Comments

Get In My Belly Banana Bread

In our house someone always ends up buying more bananas than they can eat, in hopes that they will magically turn into banana bread. That someone usually gets his wish – what a lucky guy!

I can’t remember where I came across this recipe, but I have made a few tweaks over the years and it seems to work out perfectly every time.

Part of the reason I am sharing this recipe with you guys is because I need to rewrite my post-it note of ingredients or else I may soon lose it.

Seriously… this is a health hazard. And look at how I spelled flour – I don’t know if I can ever live that one down.

I always thought making banana bread was a really tough feat – until I came across this recipe. I have been using it for as long as I can remember and I hate to brag [kinda] but I’ve been told it is the best out there! I should probably mention that this isn’t the healthiest recipe on the market [it isn’t the worst either though], but it is totally worth it!

GET IN MY BELLY BANANA BREAD

Makes 1 loaf

What you will need:

Simple and few ingredients – as usual!

3-4 very ripe bananas [the ones in the picture are for show, I usually freeze my brown bananas and defrost them when I am ready to bake]

1/3 cup melted butter or margarine [either work so it is your preference]

1 cup sugar

1 and 1/2 cup all purpose flour [I have made this recipe using whole wheat flour with success]

1 tsp vanilla

1 tsp baking soda

1 egg

pinch of salt

What to do:

Step 1:  Preheat the oven to 350 degrees.

Step 2: In a large bowl, thoroughly mash the bananas – I use a potato masher for this task.

Step 3: Add the melted butter and sugar and continue to mash everything together.

Bananas, margarine and sugar mash.

Step 4: Add all of the remaining ingredients and mix well using a fork or spatula, whichever you prefer.

Ready to be poured into the pan.

Step 5: Grease a loaf pan using butter or margarine. This is essential to easy removal from the pan.

Step 6: Pour the batter into the loaf pan – the batter will be quite thick and sticky.

Before the oven.

Step 7: Bake for 60 minutes.

Step 8: Allow to cool in the loaf pan for 15 – 20 minutes.

And after. I love the way it cracks at the top and caramelizes – so pretty and tasty!

Step 9: Serve and enjoy!

This banana bread doesn’t last more than a few days in my house. I bake for banana bread purists so I don’t add any extras, however, adding nuts or chocolate chips would be delicious – your call though!


Leave a comment

Chocolate Chunk and Almond Butter Cookies [with a healthy twist – dairy and gluten free]

I know it is only mid November, but is anyone else starting to get into the holiday baking spirit? Last night [a non convicted] Martha Stewart took over my body and I spent the evening baking my  famous ginger cookies

Big Soft Ginger Cookies

for my favourite people – and who am I kidding, I made some treats for myself too! The recipe I’m going to share with you has a secret ingredient that makes them healthy and filling. I know it is going to sound a bit strange but just trust me on this one – I’m seriously becoming the queen of “weird” recipes among my friends. Everyone I have shared these cookies with went back for seconds – that is how delish they are – especially right out of the oven when the chocolate is gooey, like this:

Ooey Gooey Chocolate!!!

Okay, so here is the secret – chickpeas [SAY WHAT?!]. Seriously. The base of the cookie is made from chickpeas. Enough anticipation, here is the recipe!

Almond Butter, Chocolate Chunk Cookies

Recipe adapted from: Texanerin Baking

What you need:

Only 7 ingredients!


  • 1 can of chickpeas, rinsed and patted dry with paper towel
  • 2 teaspoons of pure vanilla extract
  • 1/2 cup + 2 tablespoons of natural almond butter (I used raw)
  • 1/4 cup honey
  • 1 teaspoon baking powder (look for a gluten free brand if necessary)
  • a pinch of salt
  • 80g of dark chocolate (I used a full chocolate bar minus 2 big squares – you can use more or less depending on how chocolatey you like your cookies)


What to do:

What a mess!

Preheat the oven to 350 degrees and line a cookie sheet with parchment paper [this will save you a lot of clean up]. Add all of your ingredients (except for the chocolate) into a high powered food processor and blend until smooth and creamy. Even though this mixture doesn’t have any egg and is safe to eat raw I don’t recommend doing so. The batter uncooked tastes pretty brutal – they will get better though, save yourself the disappointment and wait a few more minutes to taste your creation!

Next you’ll have to smash the chocolate into smaller pieces. I use the term “smash” because I literally take a hard spatula and hit the chocolate until it breaks into smaller chunks – I should have taken a video, it is beyond ridiculous, but it is a great way to let out some aggression and it is lots of fun! Once the chocolate is broken into pieces add it to the food processor and pulse quickly once or twice just to mix it in.

Adding the “smashed” chocolate pieces!

You should end up with a mixture that is sticky and a bit slimy [awful way to describe cookies] so you’ll want to use a spoon to transfer the batter into 12 cookies on your lined cookie sheet. These cookies don’t change much in size at all when baked so keep that in mind. I press down on the ball just a bit so they aren’t as puffy. It should look something like this:

chocolate almond butter chickpea cookies

Uncooked Almond Butter, Chocolate Chunk, Chickpea Cookies.

Bake for 10 minutes – or a bit longer if you want a bit of crunch, these cookies are very chewy.

Baked Cookies.

They look pretty much the same except you can see the melted chocolate chunks inside and the browned edges! Wait about 5 minutes [if you have any self-control] and dig in while they are still warm!

You can’t even tell that these are healthy cookies, they are so good – this is the 4th batch I’ve made in the past three weeks.

And for your friends and family that are sick of your healthy treats – make them some ginger cookies, they’ll be happy – and that will keep them away from your healthy but delicious desserts [insert evil laugh here]!

Big Soft Ginger Cookies! You can find the recipe on the blog.

Happy Baking!!!


Leave a comment

Meatless Monday: Gluten and Dairy Free Mac & Cheese!

Don’t worry, I know the title is a bit contradictory – but it really is gluten and dairy free mac & cheese… if you have an open mind. It doesn’t take exactly like cheese, but it is delicious, and pretty healthy!

I like to use zucchini noodles for this recipe, but I have also had success with brown rice pasta. If you are looking for comfort food, I would recommend using the gluten free pasta – or regular pasta if you can handle it!

Dairy and Gluten Free Mac & Cheese

Inspired by: http://detoxinista.com/2011/01/move-over-kraft/

Recipe serves about 4 people.

It looks kind of strange, but most gluten and dairy free food does.

What you will need:

For the cheese sauce:

1 1/2 cups raw cashews
3 T. fresh lemon juice
3/4 cup water
1 1/2 tsp. sea salt
1/4 cup nutritional yeast
1/2 tsp. chili powder
1/2 clove garlic
pinch of cayenne pepper
1/2 tsp. mustard (dijon or yellow)

Other:

zucchini (I use about 2 person if I am not cooking it – if I cook it I will use at least 3 per person) or pasta of your choice
paprika for garnish
broccoli
green onion

Ingredients for the “cheese” sauce.

What to do:

Combine all of the “cheese” sauce ingredients into a high powered blender. If your blender isn’t very strong I would suggest soaking your cashews overnight to soften them. I skipped this step though because my magic bullet can handle the raw nuts.

Process in the blender until everything is completely mixed and you have a thick sauce.

Next you will need to use a spiral vegetable cutter to create your zucchini noodles- like the one I used here. It should look like this when you are finished [I used both green and yellow zucchini].

Zucchini Noodles

If you aren’t using zucchini, I would recommend starting the pasta before making the sauce.

Finally, roast the broccoli and onions, I usually use a bit of coconut oil and salt an pepper.

Now it’s easy – just combine all the parts [noodles, “cheese” sauce, and roasted veggies]. Top with paprika and enjoy.

Another option is to heat it in the oven at 350F for 30 minutes to warm the dish and create a crispy layer on the top. I enjoy both, however, if you are using pasta instead of zucchini, I would recommend using the oven method.

Try it out and let me know what you think! This is quite an easy recipe to make and it is really good!


1 Comment

My Take on the Green Smoothie

If you’ve spent any time browsing health related articles online or in magazines, you’ve probably heard all about the green smoothie. From what I can tell, it’s name comes from the greens that are often used as a main ingredient – so clever! I’ve tried a few recipes I stumbled across online, but my favourite is the blend I made myself. Care to try?

The Ellepottsie Green Smoothie

I know it doesn’t look very green but it is!

Ingredients

1 scoop of protein powder (I usually use vanilla)

1 tbsp chia seeds

3/4 cup water (you may need to add more if your blender isn’t very strong)

1/8 tsp xanthan gum (can be omitted but it gives the smooth a nice consistency)

1.5 cups of spinach or kale (or combination of both)

1 cup frozen berries

I used strawberry protein in this mix, that’s why it looks pink.

What to do

Combine the first 4 ingredients (water, protein powder, chia seeds, and xanthan gum) and shake really well so everything is combined. Next add the greens and berries and blend until smooth. I find it usually takes about a minute, maybe slightly longer if I use only kale and include the kale stems.

If it doesn’t blend well, you probably need to add a bit more liquid.

And there you have it, a green [not so green] smoothie! This is one of my favourite post workout meals, or breakfasts – if I’m running late!


2 Comments

The Best Ginger Cookies [and they are easy to make]

My office is having a cookie swap next week! I am so excited, I love to bake cookies. I figured I should test out a few recipes before making my decision on what to bring in to share. And yes, I know this is a complete contradiction to my healthy recipe earlier this week.

Last night I made the easiest ginger cookies. They are big and soft and taste great, but the best part is that you can literally make them in 10 minutes [plus 10 minutes of baking] – now that is my kind of cookie!

I promise you can’t go wrong with this recipe, so here it is:

Big, Soft, Delicious Ginger Cookies

Recipe from: http://allrecipes.com/recipe/big-soft-ginger-cookies/

What you will need:

I like recipes with fewer than 15 ingredients. Anything more than that and I am starting to worry.

  • 2 1/4 cups all-purpose flour
  • 2 teaspoons ground ginger
  • 1 teaspoon baking soda
  • 3/4 teaspoon ground cinnamon
  • 1/2 teaspoon ground cloves
  • 1/4 teaspoon salt
  • 3/4 cup margarine, softened
  • 1 cup white sugar
  • 1 egg
  • 1 tablespoon water
  • 1/4 cup molasses
  • 2 tablespoons white sugar


What to do:

Step 1

Preheat the oven to 350 degrees.

Step 2

Cream together the margarine and sugar. I use a mixer to do this. It should look like the picture below – you can see the mixer attachment in the left corner.

The first step to making a perfect cookie!

Step 3

Add the egg and beat it into the creamed margarine and sugar. Next add the molasses. This is my favourite part because it looks cool – I’m easy to please.

So pretty! Hahaha!

Step 4

Add the rest of the ingredients with the exception of the last 2 tablespoons of sugar and mix well. It should look something like this. Don’t worry if the consistency is a bit runny, you want it to stick together enough to form some resemblance of balls on the baking sheet but you shouldn’t be able to roll them in your hands. I usually just use my hands to plop the mixture on the baking sheet.

Ready to be made into delicious cookies!

Step 5

Separate the mixture into 24 blobs on your cookie sheet. It will look like this. Then add the left over sugar on top of the uncooked cookies. Don’t make the cookies too big because they will grow when you bake them.

Waiting to be put in the oven!

Step 6

Bake for 8 – 11 minutes of until the edges become slightly darker. Remove from the oven and let cool for 5 minutes… if you are able to wait that long – they smell amazing!

The cooling period.

And there you have it, delicious easy ginger cookies… and did I mention they are dairy free! Store the cookies in an air tight container, although they will probably get eaten very quickly!

Enjoy!

Big, Soft, Delicious Ginger Cookies